Connecting Azure API Management, Azure AD B2C, and Paddle with .net 5 Razor App, Part 1

I'm a .NET Developer working on MS Stack for more than 12 years already. I worked with most dotnet-based technologies, from WinForms to Azure Functions.
In my time, I won a dozen hackathons, launched a couple of startups, failed them, and am now working as a lead .NET developer in an enterprise company.
If you ever wish to wrap your API into a usable SaaS product with subscriptions, payments, plans, limitations, using no-code (or minimal code) feel free to check how I did this for my own product.
Full disclosure
I am a founder of API.chat and this article is based on my and my team's experience of connecting Azure API Management, Azure AD B2C, and Paddle for the needs of my product. I hope it will be useful for you if you ever want to monetize your APIs with Azure API Management and Paddle.
Please, note
- This article will not cover the setup of Azure API Management (thereof AAM), you can read more about it here
- This article will not cover the setup of Azure AD B2C (thereof AAD B2C), you can read more about it here
- This article will not cover the setup of the Paddle
Ok, now when all this out the way, let's begin.
Introduction
In 2015 Telegram introduced chatbots and I created the first version of XML-based Telegram chatbot builder. The idea was to give developers an easy way to build and host chatbots with XML-like language. Using our builder we built what I presume was the first in the world chatbot for selling apparel for Shopify (we called it "Siri for Shop" then) - which bring us victory on HackJunction hackathon in Helsinki, Finland in 2015. In the end, chatbots didn't become the future of e-commerce but rather took some small part in that market.

Anyway, soon after that, we moved to B2E and for the past five years used and improved our platform by building chatbots for HR and internal communications (you can call it "Siri for Employees").
But the idea of providing the easy way never left me, and a couple of months ago I decided to open a platform to every developer who wants it (if any ;)). But our builder consists of 6 microservices, some queues, SQL, and no-SQL databases combined with minimal UI - purely for in-house usage. To implement the idea I would need to build an entire client-oriented web app by myself with subscription management, payments, tokens, plans, etc. And that's for a tool that might be not used by anyone except my team.
Luckily today no-code has become a mighty thing, and there are new types of no-code tools: API Management. AWS has one, Azure has one, and there are some independent solutions as well. I, as a proficient Azure user, decided to use whatever Microsoft provides.
Hybrid, a multi-cloud management platform for APIs across all environments
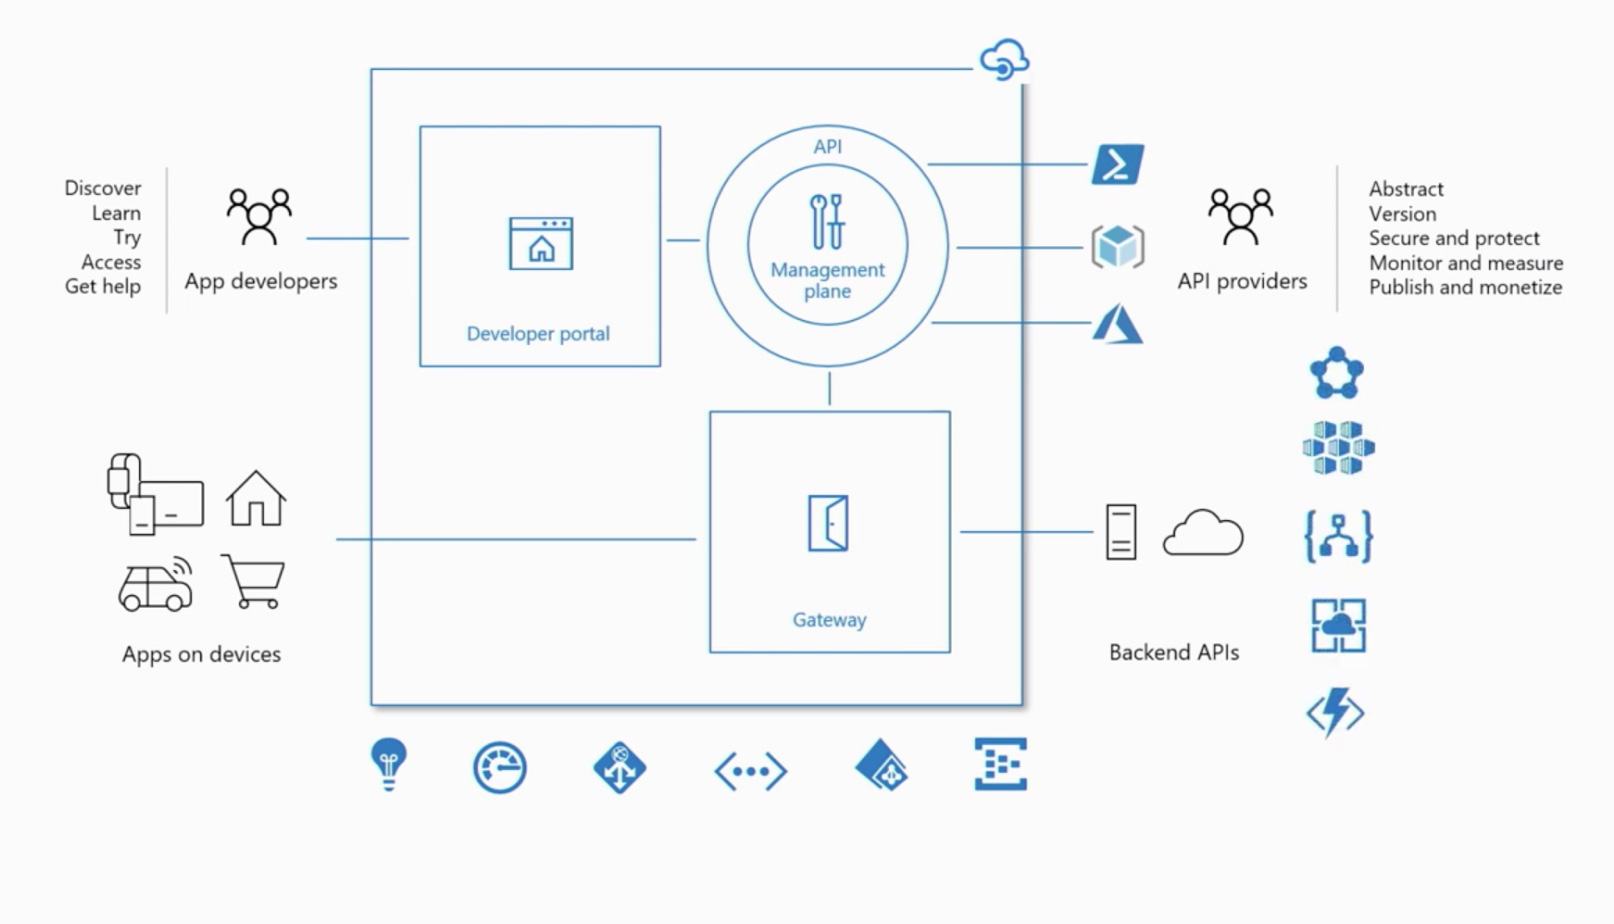
It is a set of tools that claim that you can easily wrap your API, build a developers portal, subscription management, and much more. And that's kinda true.
The problem, like in many no-code tools, comes when you need to move from standard patterns to something not-supported by the platform - like in the case of AAM - payments and GitHub auth. Let's explore how we solved it and hopefully, you can as well.
0. The Plan
The plan was quite simple:
- Understand how to provide and monetize our API
- Delegate SignIn/SignUp and write a code to process and redirect AAM sign-in to AAD B2C (docs)
- Use Azure SDK REST API to create and authorize users
- Delegate subscription management and write your own custom subscription process with Paddle.
- Use Azure SDK REST API to manage subscriptions
- Delegate all other operations like ChangePassword, ChangeProfile, CloseAccount, SignOut, Unsubscribe, Renew
- Stick with as little code as possible
- Open source solution app to save you some time
1. Introduction to AAM and how to monetize APIs with it.
To provide our APIs I decided to wrap it to an extra-layer that normalizes it, hides internal services, and presents a clean, properly versioned, and easy-to-use API from a single point. AAM provides us API gateway to do so.
It also must have convenient documentation, subscription management, reports, and the ability to test endpoint directly from the browser. AAM provides us with a developer portal filled with these features.
To monetize our APIs we stuck to Subscription Billing, where we charge customers a flat monthly fee to access APIs, according to the selected Plan. Plan (or Product in terms of AAM) will provide the limitations: a certain number of API calls per month, maximum users, a certain APIs access, and so on.
Most of these limitations can be defined in so-called Policies - a powerful feature of the API Management platform. Not every limitation can be defined through policy though: for example, we were forced to add max users limit manually.
Users can subscribe to a Plan/Product and get access to APIs on the Product terms. By default AAM allows users to request a subscription and allows the administrator (you) to accept or decline it. And you can create a Plan/Product that can be accepted by default, like for free or trial. To be honest, that's more than enough to start - just get subscription requests, bill users manually, and approve the access.
If you want more self-service here, like us, you need to delegate subscription management to third-party service, and that's where the hard part begins. You need a preferably out-a-box solution to process payments, manage recurrent payments and subscriptions. Stripe is a nice option, or Paddle if the first one is not supported in your area.
To make it all click together you need to match your Subscriptions in payment providers to your Products in AAM. Next, you will need to set up delegation redirects and callbacks to process subscribe, unsubscribe, renew. And that can't be done without setting up sign-in and sign-up delegation first.
The overall solution might look like this
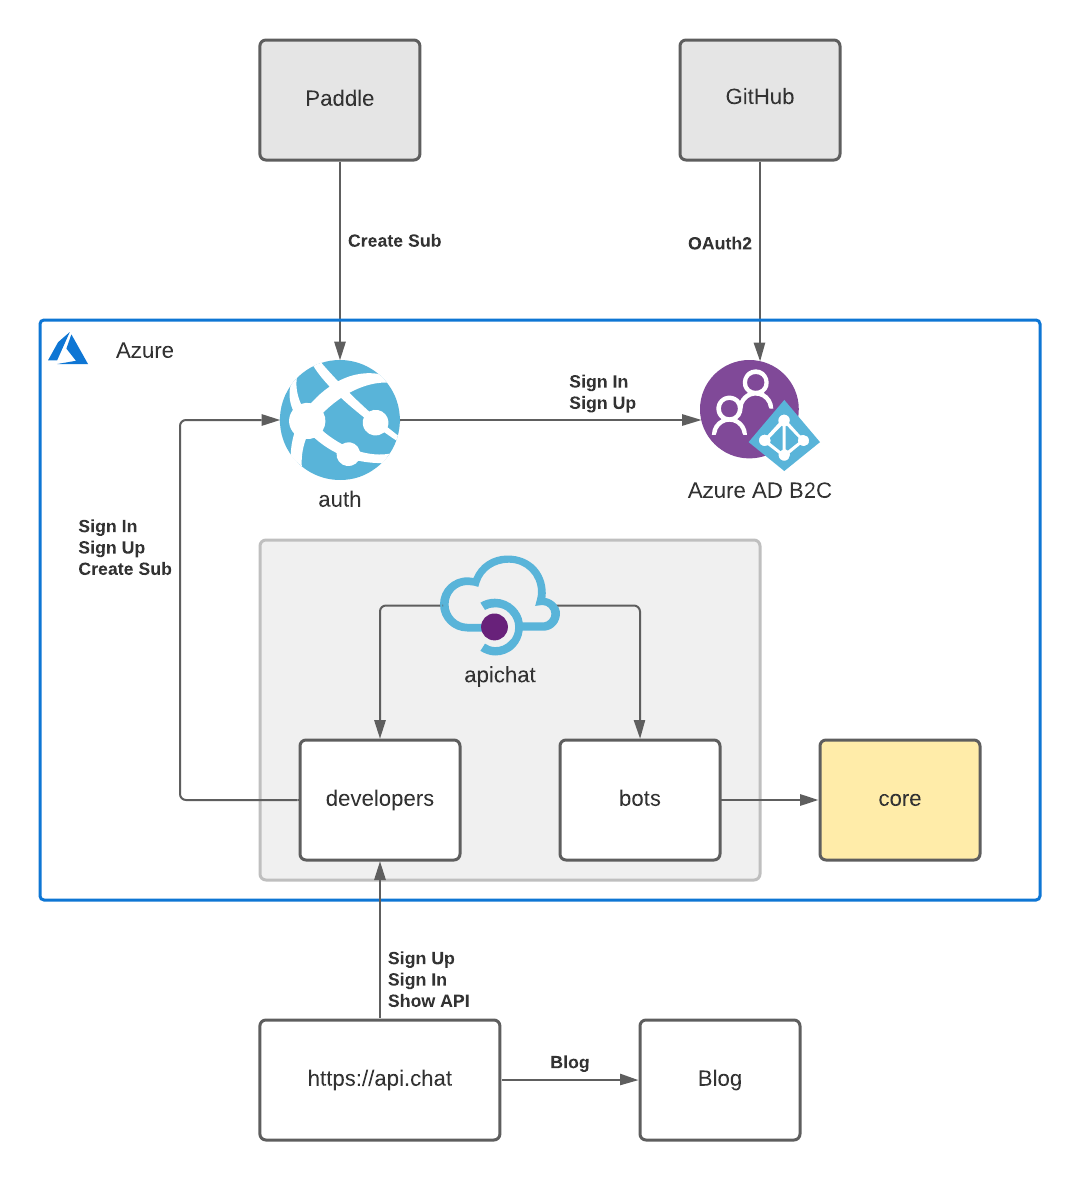
You can read a bit more about it here
2. Delegate sign-in and sign-up to Azure AD B2C.
To allow developers to sign-in and sign-up through GitHub you need to delegate these processes from AAM to a third-party web-app, your web-app. To save a lot of time we used AAD B2C for user management in the web-app. We could use AAD B2C directly in AAM, but to delegate subscriptions management, we need to delegate sign-in anyway.
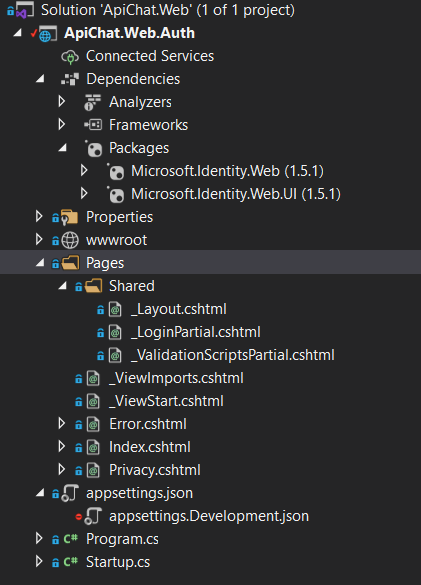
As an in-between service, I chose a simple .net razor app. In fact, .net provides ready-to-use template of a web-app with built-in AAD B2C auth.
2.1 Create in-between service from template
To create a web-app from the template you should use the dotnet new command
First, install templates from NuGet
dotnet new --install Microsoft.Identity.Web.ProjectTemplates::1.5.1
Next, create a new app from the template
dotnet new AuthApp --auth IndividualB2C
Don't forget to fill in AAD B2C settings in appsettings.json. I assume that you already created AAD B2C - there are good manuals on that
"AzureAdB2C": {
"Instance": "https://contoso.b2clogin.com/",
"ClientId": "11111111-1111-1111-1111-111111111111",
"CallbackPath": "/signin-oidc",
"Domain": "contoso.onmicrosoft.com",
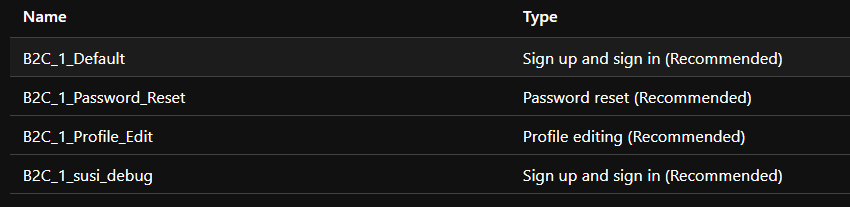
"SignUpSignInPolicyId": "B2C_1_Default",
"ResetPasswordPolicyId": "B2C_1_Password_Reset",
"EditProfilePolicyId": "B2C_1_Profile_Edit"
}
That will give you a fully-function AAD B2C app with sign-in, sign-out, profile, and password reset features. Don't mind the design or content of the app - it will not be shown in 80% of cases. I think it might be even possible to reduce this app to a couple of controllers without any visuals whats so ever.
To ensure the app works properly with AAM you need to do an additional setup of AAD B2C and its user-flows
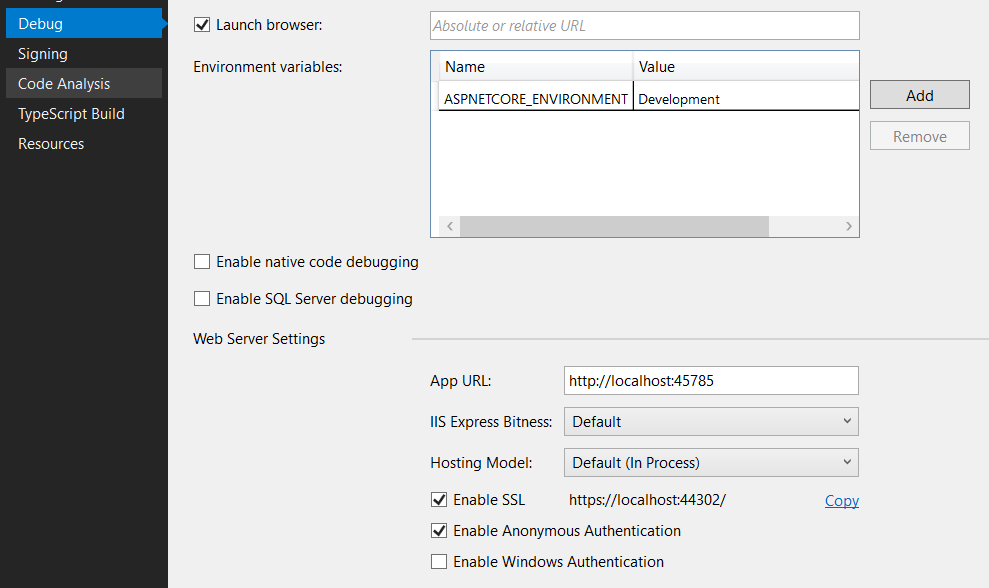
- In your registered App page, on the Authentication tab, you should add the URL of your localhost test server. You can add it as Web or SPA - both will work fine (at least for me). You can add a production URL as well if it's ready.
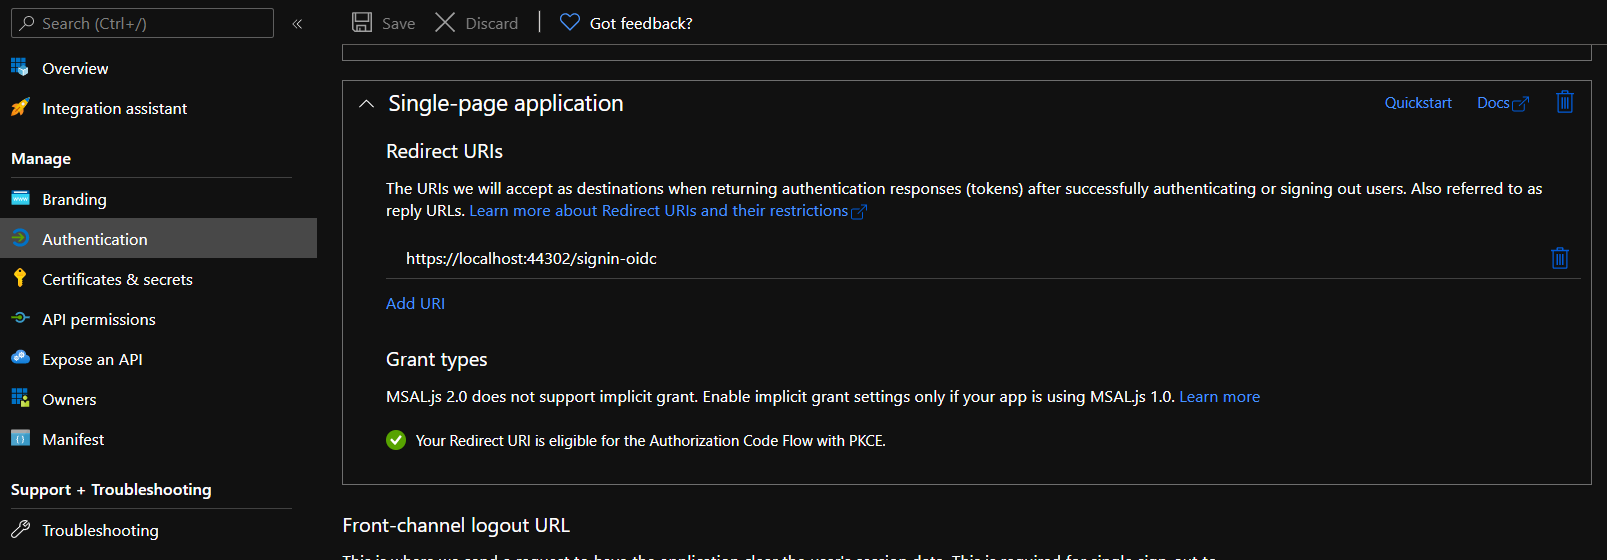
Test URL can be seen in in Properties/Debug/Web Service Settings of your project
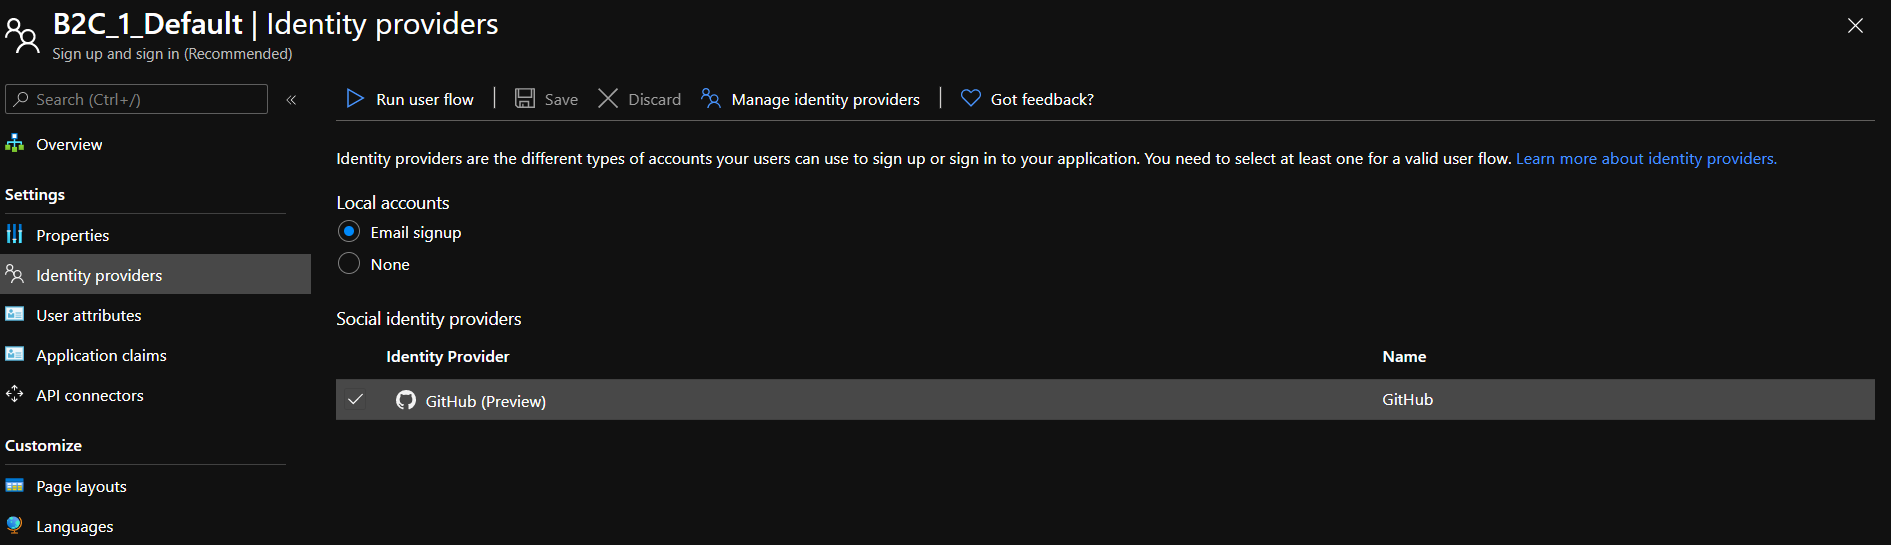
- Ensure that you add GitHub identity provider.
- Now it's a good time to setup Company Branding as well
- You should create user-flows at this point already, but for AAM we need setup it a bit more.
- Your sign-in user-flow should have GitHub as an identity provider
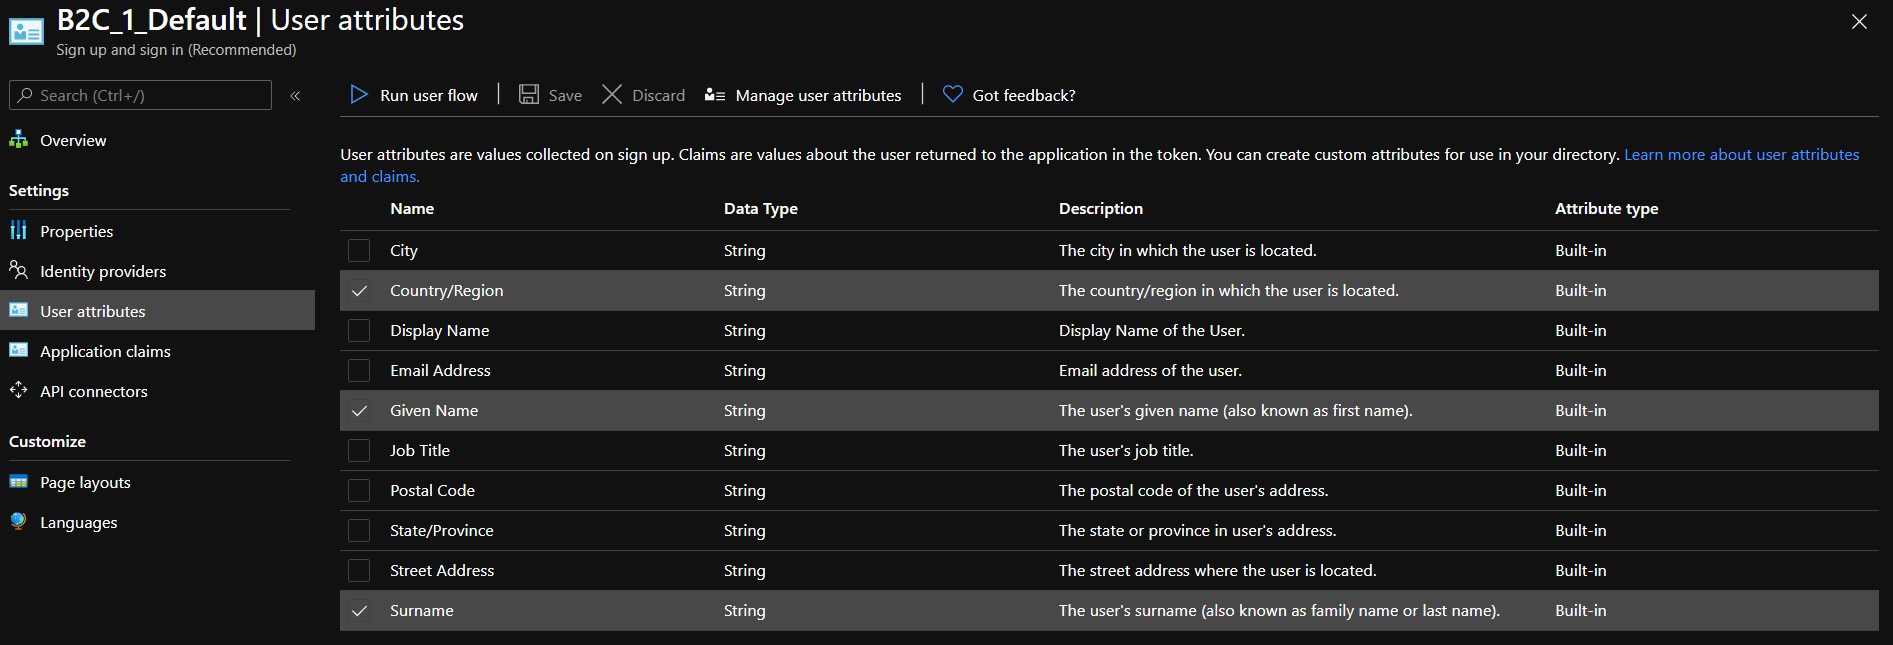
- AAM requires Name and Surname not to be null, and because you add GitHub as identity provider - you need to set relevant claims as well.
These are user attributes that are required for AAM for sign-up (Country is not required, you can omit it)
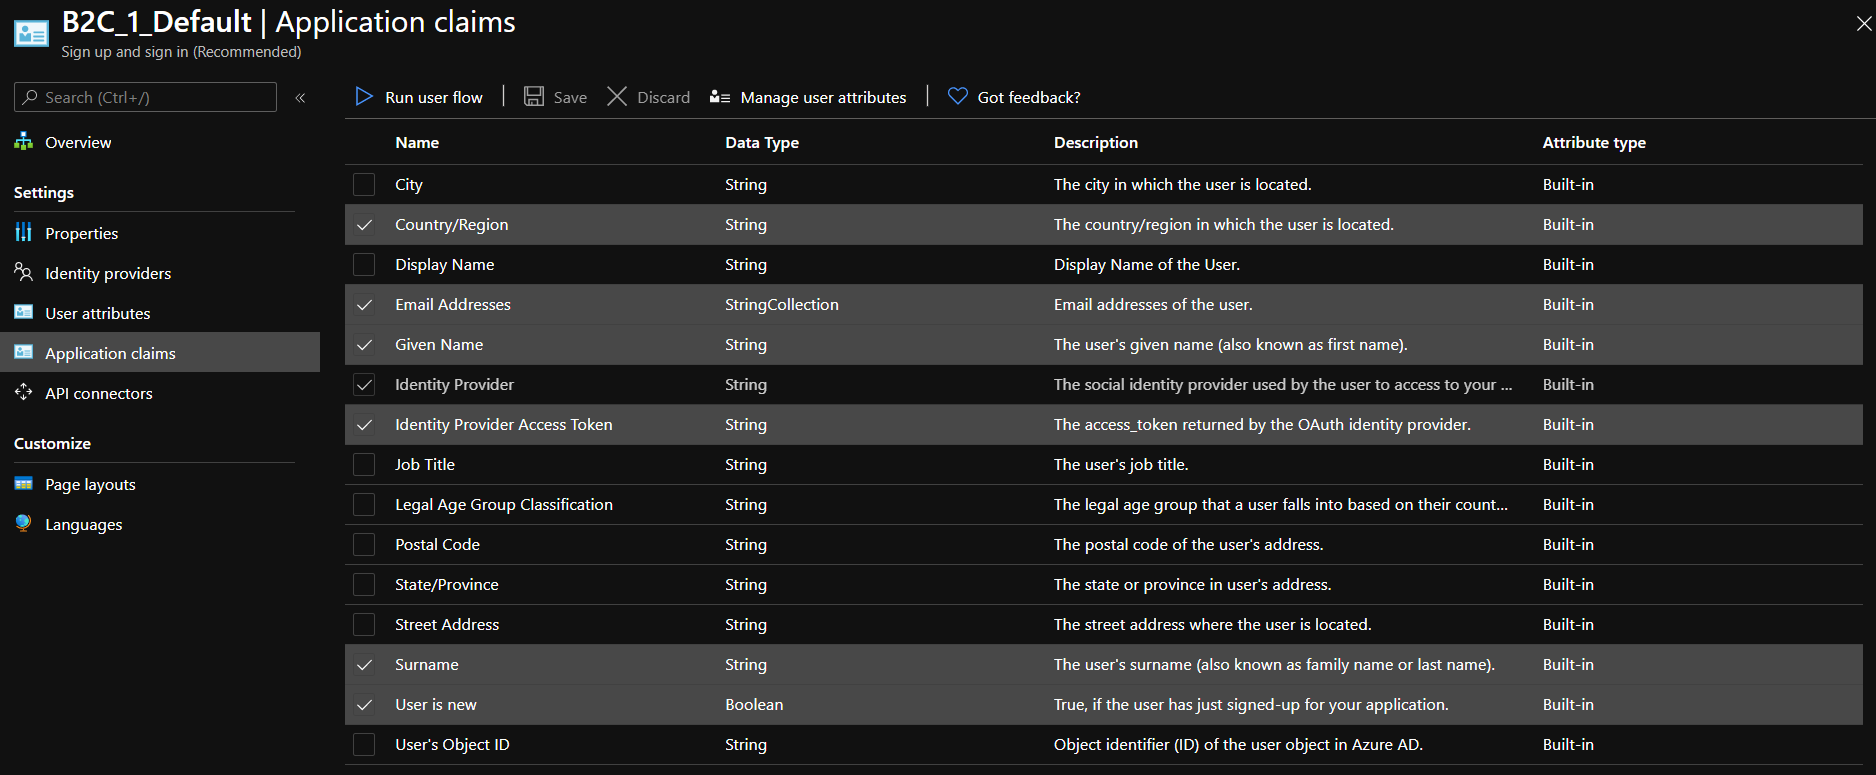
 And these are claims that I return on sign-up and profile edit user-flows (Country is optional)
Hint
What I like to do with user-flows is to create two of them for sign-in/sign-up: for prod and for debug, and disable email validation for debugging. It saves a lot of time in testing.
To do so you need to create a new user-flow, get into Page Layouts of Local Sign-Up and disable email validation (set it to No)
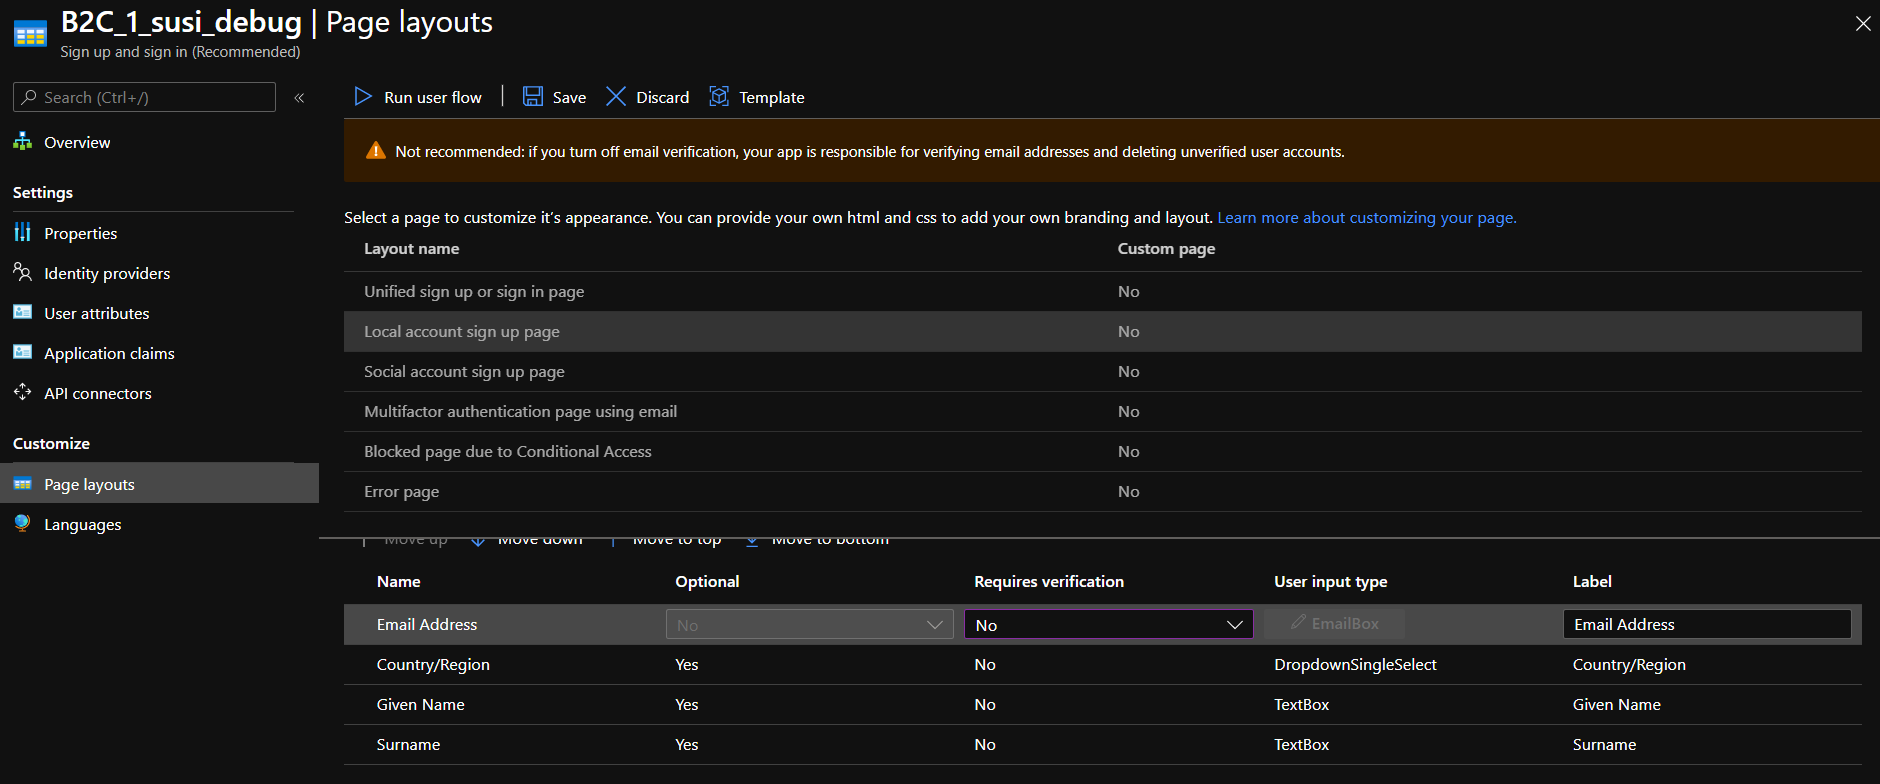 Note that this setting will reset every time you save this user-flow for some reason, so you need to disable it on every change.
You can sign in, sign up and do all other user-related stuff.
2.2 Add delegation handler
There are several ways to add a callback handler for delegation. The easiest way IMO is to add the Razor page with the backend and handle everything in the OnGet() method.
Let's add a new Razor Page ApimDelegation.cshtml. This page will come with the model ApimDelegation.cs.cshtml and it will be your primary entry point for all delegated calls. You should not care about page content itself, only for the OnGet method.
public async Task<IActionResult> OnGet()
{
...
}
For now, you want to handle only sign-in/sign-up operations. AAD B2C built in a way that you can't navigate directly to the sign-up page (or at least I didn't found the way), so both these operations should be handled together. First, let's introduce operations enum
public enum Operations
{
    SignIn,
    SignOut,
    ...
}
All required information will come in GET request from AAM
http://www.yourwebsite.com/apimdelegation?operation=SignIn&returnUrl={URL of source page}&salt={string}&sig={string}
which is very easy to process
var operation = Enum.Parse<Operations>(Request.Query["operation"].FirstOrDefault());
var returnUrl = Request.Query["returnUrl"].FirstOrDefault();

if (!_validationService.TryValidation(Request, returnUrl))
{
    return Unauthorized();
}
validationService.TryValidation- For security reasons you are advised to verify that the request is coming from Azure API Management. sig and salt parameters are used to calculate and verify the hash. If the hash does not match, we break the execution.
If validation OK you can go to sign-in/sign-up processing:
switch (operation)
{
    case Operations.SignUp:
    case Operations.SignIn:
    var parameters = HttpUtility.ParseQueryString(string.Empty);
    parameters[SignInDelegationModel.RequestQueryRedirectUrl] = returnUrl;

    var urlBuider = new UriBuilder("https", Request.Host.Host, (int)Request.Host.Port)
    {
        Path = "SignInDelegation",
        Query = parameters.ToString()
    };
    var returnUrlAfterSignIn = urlBuider.Uri.ToString();
    return Redirect($"/MicrosoftIdentity/Account/Challenge?redirectUri={returnUrlAfterSignIn}");
}
There is a built-in SingIn method coming with the template, but it's hardcoded to redirect to ~/. Instead of the built-in method, you should use the MicrosoftIdentity/Account/Challenge method where you could provide a custom redirect endpoint to the Razor page for sign-in processing.
Now, you need to create a separate endpoint for handling successful sign-in/sign-up. The easiest way is the same - create a new Razor page SignInDelegation.cshtml and use OnGet of its code-behind.
 public async Task<IActionResult> OnGet()
 {
     var returnUrl = Request.Query[RequestQueryRedirectUrl].FirstOrDefault();
     var user = HttpContext.User;

    if (!user.Identity.IsAuthenticated)
    {
        return Unauthorized();
    }
}
Here you get your User and all his claims. Now you can create and authorize User in AAM.
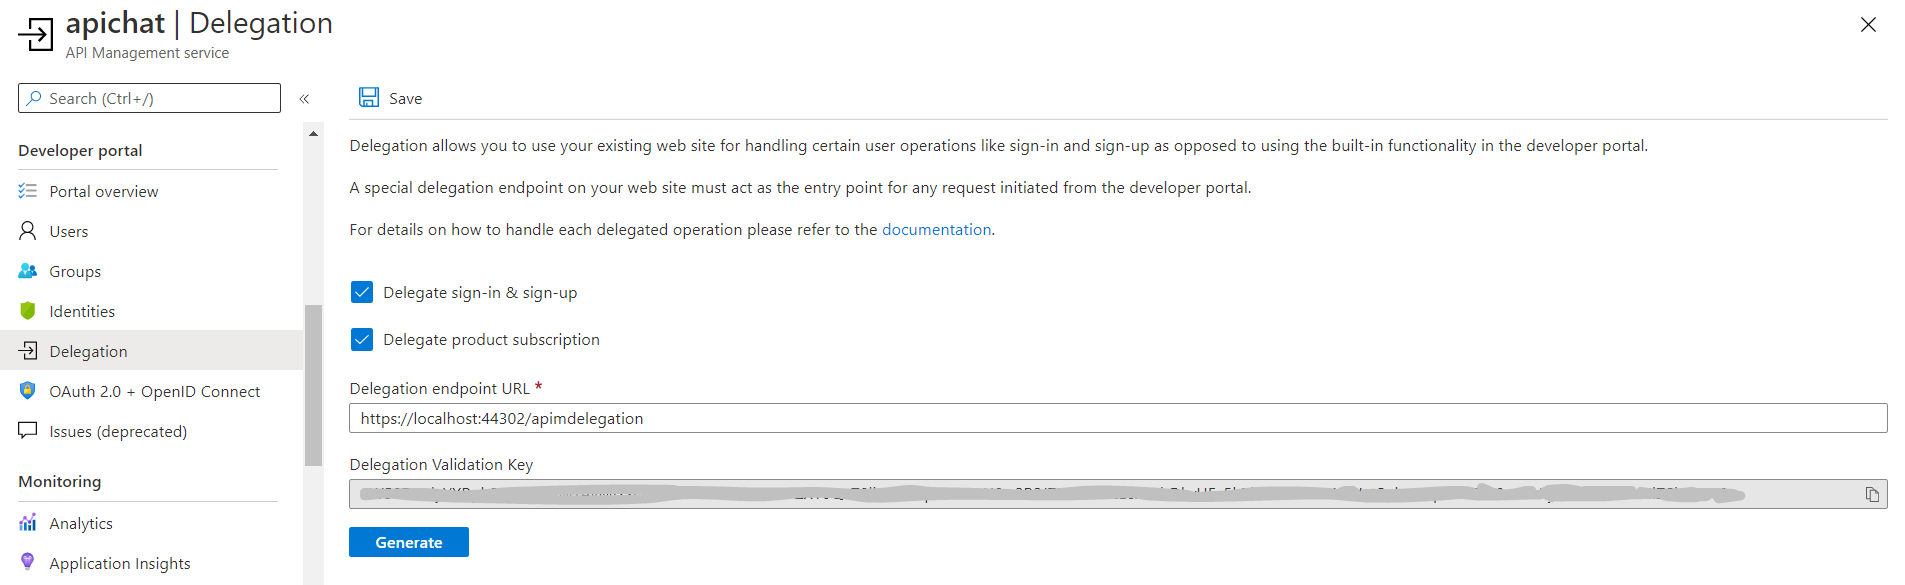
At this point, you can enable delegation in AAM settings and set it up to the newly created endpoint - after that when you press sing-in in your developers portal you would be redirected to web-app, then to AAD B2C, then back to web-app, which would redirect you back to AAM.
3 Use Azure SDK to create and authorize users
After you get authenticated User you can create it in AAM and authorize it. There are two options for how you can create a user: Management API available through AAM settings and Azure Resource Manager (ARM) available through Azure SDK You should never use Management API. In fact, there should not be any Management API - because it does not even have documentation available anymore anywhere. You can make fun of my frustration about that fact in this Twitter thread.
3.1 Azure Resource Manager (ARM) setup
ARM is used in the web-app through Azure SDK package Microsoft.Azure.Management.ApiManagement. It allows you to perform any operation that can be performed through portal UI and sometimes even more.
There are separate packages for each service, but we interested only in AAM, and for now - only users
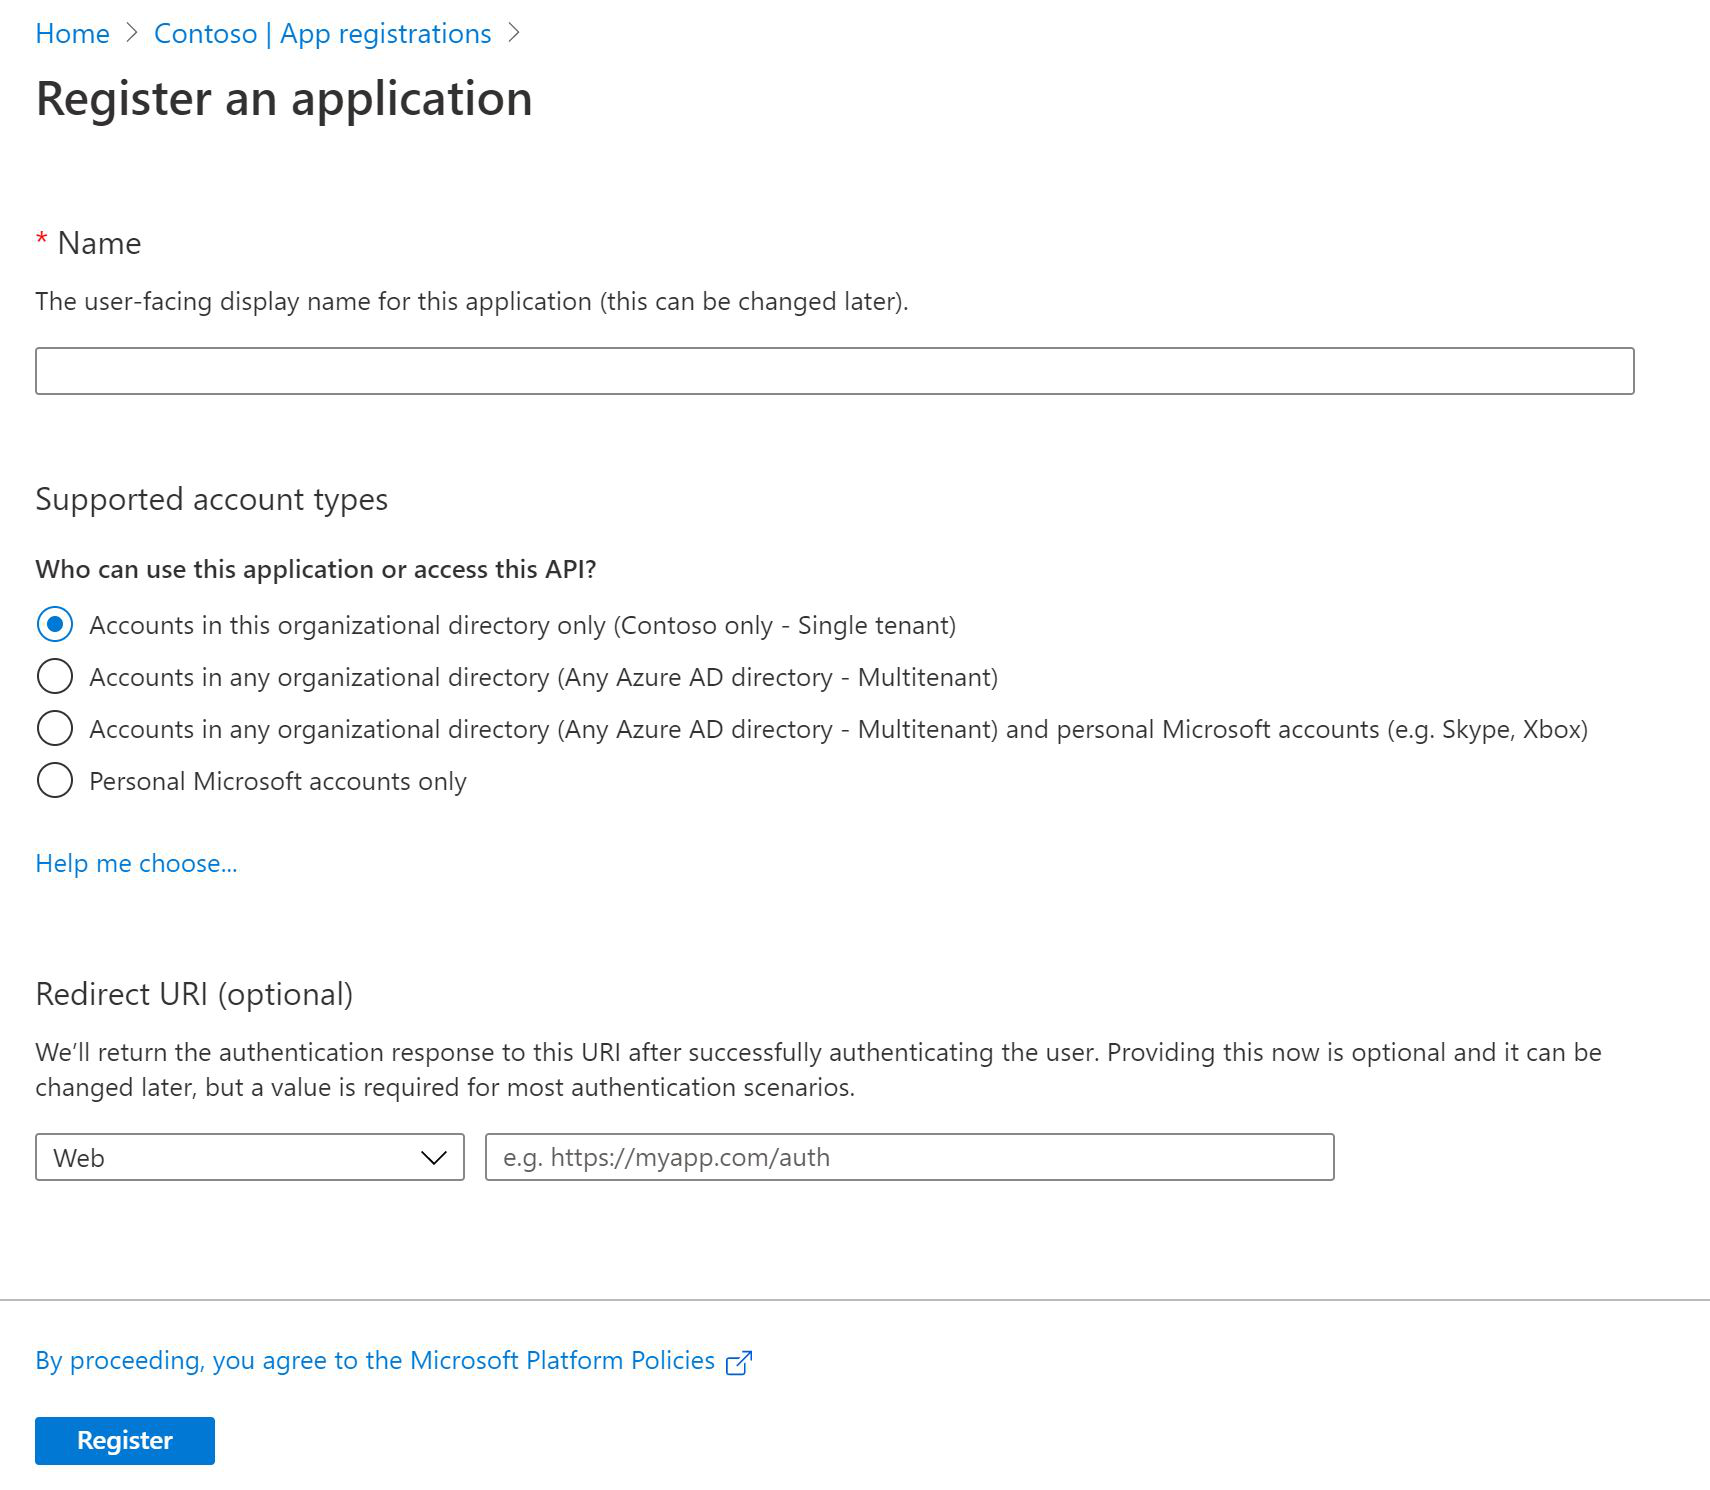
To use ARM REST API first you need to create an Application and service principal in Azure Tenant and provide access to AAM through this application. To do so you should navigate to Azure Active Directory blade of your tenant where AAM is located, then to App Registration and create new Registration.
You should give it a name and select Accounts in this organizational directory only (ChatFirst only - Single-tenant) - all other stuff can be left by default.
 It's all in details explained in the documentation.
That will give you an application on behalf of which you will be executing REST requests to Azure SDK API.
Next, you need to create a Client Secret on Certificates & secrets to use for subscribing REST requests.
Overall you need the next settings
  "AzureSdkClient": {
    "ClientSecret": "your-app-secret",
    "ClientId": "your-app-client-id-from-overview",
    "TenantId": "your-app-tenant-id-from-overview"
  }
And finally, you need to give access to AAM for the created service principal (Assign Role). That will ensure that the application has access only to AAM and nothing else.
3.2 Azure Resource Manager (ARM) usage
Performing any request to Azure SDK API always requires two steps:
- You need to acquire a token with your application credentials
- You need to perform REST request subscribed by the token
There are so many ways to get this token it's almost exhausting. Official manuals provide this way. We didn't use it.
Instead, we go with a much simpler, but the not-recommended way by using ClientSecretCredential from Azure.Identity.
public async Task<AccessToken> GetAccessTokenAsync()
{
    var credential = new ClientSecretCredential(_tenantId, _clientId, _clientSecret);
    return await credential.GetTokenAsync(new TokenRequestContext(new[] { ScopeApiManagement }));
}
Apparently, this should not be used, so we switch to the more valid method - custom ITokenProvider implementation
public class ApiManagementTokenProvider : ITokenProvider
    {
        ...
        public ApiManagementTokenProvider(IConfiguration config)
        {
            _config = config;
        }
        public async Task<AuthenticationHeaderValue> GetAuthenticationHeaderAsync(CancellationToken cancellationToken)
        {
            // For app only authentication, we need the specific tenant id in the authority url
            var tenantSpecificUrl = $"https://login.microsoftonline.com/{_tenantId}/";
            // Create a confidential client to authorize the app with the AAD app
            IConfidentialClientApplication clientApp = ConfidentialClientApplicationBuilder
                                                                            .Create(_clientId)
                                                                            .WithClientSecret(_clientSecret)
                                                                            .WithAuthority(tenantSpecificUrl)
                                                                            .Build();
            // Make a client call if Access token is not available in cache
            var authenticationResult = await clientApp
                .AcquireTokenForClient(new List<string> { ScopeApiManagement })
                .ExecuteAsync();
            return new AuthenticationHeaderValue("Bearer", authenticationResult.AccessToken);
        }
    }
Fill free to select whatever suits you best. There is probably an even more valid way, so feel free to add it in the comments.
Anyway, the process of using Azure SDK REST API is pretty straightforward. TokenCredentials is created with token or tokenProvider, depending on what method you use.
public async Task UserCreateOrUpdateAsync(string token, string userId, UserCreateParameters parameters)
{
    try
    {
        var apiManagement = new ApiManagementClient(new TokenCredentials(_tokenProvider))
        {
            SubscriptionId = _subscriptionId
        };
        await apiManagement.User.CreateOrUpdateAsync(_resourceGroupName, _serviceName, userId, parameters);
    }
    catch (Exception ex)
    {
          Trace.TraceInformation(ex.ToString());
          throw;
    }
}
To execute the request you would need SubscriptionId, ResourceGroupName, and ServiceName - this information available in the Overview tab of your AAM in the Azure portal.
UserCreateParameters populated from user claims in SignInDelegation.OnGet
public async Task<IActionResult> OnGet()
{
   ...
    var token = await _clientCredentialService.GetAccessTokenAsync();

    var userId = HttpContext.User.FindFirst(NameIdentifierSchemas).Value;
    var isNew = HttpContext.User.FindFirst(NewUser)?.Value;

    if (bool.TryParse(isNew, out var result))
    {
        if (result)
        {
            var email = HttpContext.User.FindFirst(EMailAddress)?.Value;
            var firstName = HttpContext.User.FindFirst(GivenNameSchemas)?.Value ?? "-";
            var lastName = HttpContext.User.FindFirst(SurnameSchemas)?.Value ?? "-";
            // Create corresponding account in API Management
            await _apiManagementService.UserCreateOrUpdateAsync(token.Token, userId, new UserCreateParameters(email, firstName, lastName,
                confirmation: "signup")); // we do not need invites - so let's skip invite email
        }
    }
}
isNew claim is used to determine the need for a new user.
EmailAddress, GivenNameSchemas, SurnameSchemas might be null in claims and AAD B2C, but should not be in AAM. For better UX FirstName and Surname of the user is optional on sign-up, so you should put placeholders if they missing. Users can always add them later In profile. Note, that the code example here is a bit obsolete - I use a "not proper" method of getting tokens.
3.2 Authorizing user into AAM
Authorizing into AAM works exactly how docs specified
public async Task<IActionResult> OnGet()
{
   ...
    var tokenResult = await _apiManagementService.GetSharedAccessTokenAsync(token.Token, userId, new UserTokenParameters() { Expiry = DateTime.UtcNow.AddHours(3), KeyType = KeyType.Primary });

    var parameters = HttpUtility.ParseQueryString(string.Empty);
    parameters["token"] = tokenResult.Value;
    parameters["returnUrl"] = returnUrl;
    var urlBuider = new UriBuilder
    {
        Host = _ssoUrl,
        Scheme = "https",
        Path = "signin-sso",
        Query = parameters.ToString()
    };

    return Redirect(urlBuider.Uri.ToString());
}
- You request Shared Access Token for User for AAM through Azure SDK REST API
- You append a returnUrl parameter to the SSO URL you have received from the API call above
- You redirect to AAM signin-sso endpoint.
You can check the entire method here
3.3 GitHub as an identity provider in AAD B2C
While adding GitHub I found out that after singing in through GitHub there are no email or user-name in claims. It looks like AAD B2C does not add the required scope or bindings into the request - which is quite sad, because we need this information to create an AAM user.
You might solve this by adding GitHub as an OpenID provider but GitHub does not implement OpenID Connect to spec: it does not support well-known/openid-connect-discovery and you have no option to manually set endpoints in AAD B2C.
So you should use Github user API to fetch all required data, that's how we do it:
- Set
Display NameandIdentity Provider Access Tokenin Application Claims of your User Flow - On GitHub auth you will get
nameakausernameandidp_access_tokenakatoken - That allows us to call GitHub user API
curl -u username:token https://api.github.com/user - By default user API returns a public user profile, which might not have a set email
curl -u username:token https://api.github.com/user/emailswill return all user associated emails - You will need the primary one
{
 "email": "***@gmail.com",
 "primary": true,
 "verified": true,
 "visibility": "public"
}
Part two here